
Getting a quick TVML “hello world” on your Apple TV is pretty simple, a quick way to test your setup, and a great way to warm up before starting a new app.
I’ll start with a quick summary in case you’re coming back to this for a reference:
- 1: Make sure you’re using the right version of Xcode (this was written with Xcode 9-beta
- 2: Open Xcode and create a new tvml project.
- 3: Set up your testing emulator or device
- 4: Launch your web server:
ruby -run -ehttpd . -p9001 - 5: Set NSAppTransportSecurity to Allow Arbitrary Loads in your Info.plist
- 6: build
Download Xcode 9
It’s still in beta as of this writing, so you’ll have get it from https://developer.apple.com/xcode/downloads/. This will take awhile to download and to open.
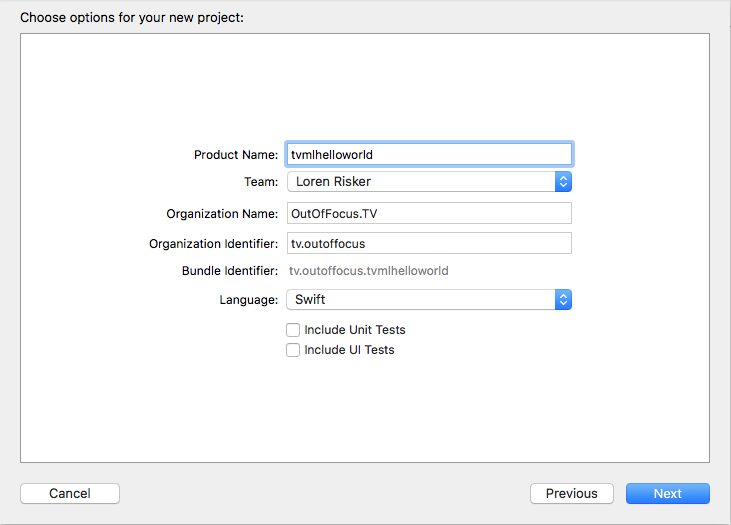
Open Xcode and create a new tvml project.

In the template chooser, choose TVOS from the top, then select TVML app and choose next.
Give it a product name. If this is your first time in Xcode, you might have to do some more stuff here, but I’ll assume you’ve used Xcode at least casually before. Make sure the language is Swift, and leave the 2 boxes unchecked. Save it in a folder. Doesn’t matter where, Xcode will keep things together for you. I keep all my TVOS projects in a TVOS folder in my documents.
 <
<
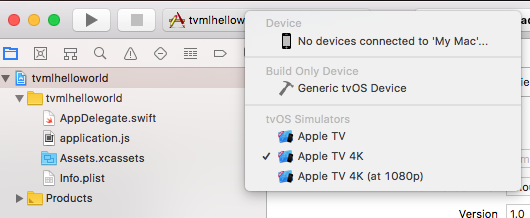
Make sure you have an AppleTV emulator (or device) that Xcode can use.
See the play button at the top? Near there will be the name of your app and next to it is a clickable box for you to choose where to launch your app. You may need to set up an AppleTV emulator if you haven’t already. But don’t hit play yet. If you do, it will build in Xcode just fine, but you’ll get an error in the AppleTV emulator.
before Step 4: here’s a little background:
TVML apps assume that the TVML and javascript you will be writing lives on a server. So the Swift part of a TVML app is tiny, with just enough code to grab your actual app from your web server. Since we’re making video apps, we already have to grab tons of data (video files, thumbnails, icons) from a remote server, so we can just put our tvml and js on the same server (or a different one, doesn’t matter. I just use my web host). So to publish an app in the app store, you will need a web host for your tvml, js, and videos.
So now we have to either make our own web server, or use one already set up and tell our project where it is. For this tutorial we will keep everything easy and local, so we’ll set up our own webserver. Fortunately Apple tells us how right in the comments in our Swift code.
Launch your web server:
ruby -run -ehttpd . -p9001
In Xcode, on the left, click on AppDelegate.swift. (you might have to click the small folder icon on the very left, or hit command-1)
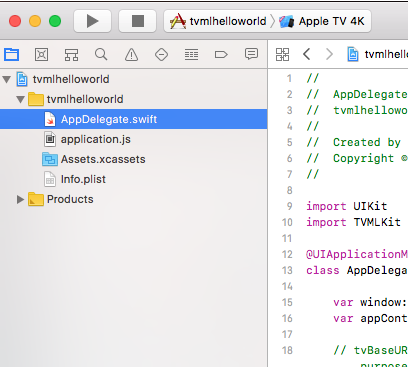
Your AppDelegate.swift will open in the main window. Most of this code can be left alone. We just need to make sure it knows where to find the rest of our code.
The information about our webserver is in line 19 and 20. Line 19 just tells us our base server name, and line 20 tells us where our first javascript file is located. The rest of the code just launches that javascript file, and the swift part of our app is done. So you could enter in a custom url here, but let’s just keep it easy and leave it alone for now. Check the comments on line 18. It tells us that running this command in terminal is all we need to do to run a webserver:
ruby -run -ehttpd . -p9001
We just have to run it from the right folder.
So open a terminal window and go to your project folder. An easy way to do this is to enter
cd
then drag and drop your project folder to the terminal window, and hit enter. The folder you are looking for sits next to your Xcode project and contains AppDelegate.swift and application.js. Verify you are in the right place by typing
ls
If you see application.js listed then great, enter:
ruby -run -ehttpd . -p9001
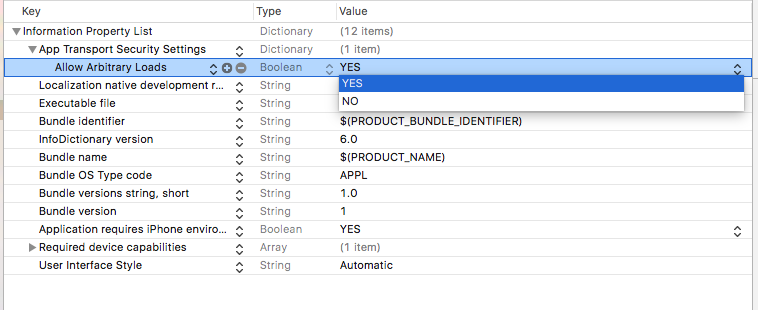
Set NSAppTransportSecurity to Allow Arbitrary Loads in your Info.plist
One last annoying task. Apple prefers https, and we aren’t running a secure local server, so we have to allow our app to access http. Go back to the Xcode sidebar and select the Info.plist. If you tried to build your app now, even though everything is setup, you’ll still get an error.
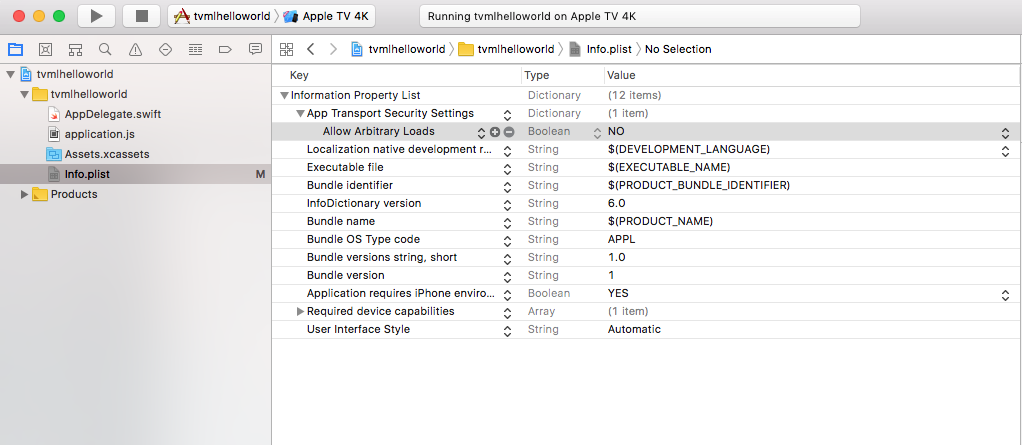
When you select Information Property List it will show a little plus sign.
![]()
Click it to add a field. Type in
NSAppTransportSecurity
Now it will automatically convert it to say “App Transport Security Settings” and add a little disclosure triangle. Twirl the disclosure triangle down. It won’t reveal anything, but if you don’t twirl the disclosure triangle down, the next step might not work.
Click the plus next to that field and select the first option, Allow Arbitrary Loads. Switch the value from NO to YES.
Step 6
Click the play button to launch your app.
If it doesn’t work, let us know in the comments.
Want to keep going? Find out how to make a single page application in the next tutorial.
Please check out my music video channel on the Apple TV appstore: OOFTV: 24/7 streaming music videos and more