TVOS tutorial – a single page video app in TVML for the Apple TV

If you’ve never made an app for the Apple TV, you might want to start with my previous tutorial, Getting Started with the Apple TV and TVOS: Hello world in TVML (updated for TVOS 11).

If you already have an idea what you’re doing – a couple disclaimers.

1) I’m not a software developer, but I’ve tinkered enough over the years to make a pretty decent app without too much trouble, which I think is a testament to how Apple has set up their platform. All I want to do is serve up videos and organize them, and to be able to use my own graphics. TVML makes tons of decisions for us and makes getting a customized Netflix like app up pretty quickly. For those of you who don’t like the constraints, then you can just write it in Swift and do whatever you want. There’s even a method for defining your own TVML elements yourself. That allows developers to create libraries and make things even easier for those of us who are hobbyists, part timers, or just need an app quickly and don’t want to start from scratch. These tutorials are written from my notes as I went through the process of creating the OOFTV Apple TV app.

2) This tutorial and the last one are straight from Apple’s TVML Programming guide. I thought their guide was very well written and the path it takes you through makes a lot of sense. I also used tutorials from Ray Wenderlich, who has a book on TVML. But there were a couple of things that tripped me up when I was starting out, so I’m hoping these posts will be able to expand a little more for people like me who aren’t so familiar with iOS development or programming in general.


Create a video + picture slideshow using a Raspberry Pi

Ever wanted to mix videos and pictures in a slideshow on the cheap? I found this useful for 3 different purposes:

1) Projecting a 6 hour dynamic slideshow at my wedding reception

2) Making a picture frame TV with endless amounts of pictures and videos of my kid for Grandma

3) Broadcasting music videos 24/7

The challenge of this project was to combine video and photos into a slideshow for cheap and to have some control over how long the photos are displayed.

The benefits of this method are:

Low power potential (depending on the display you use)

Ability to be always on

Highly customizable

Works on old TV’s, regular flatscreens, projectors, anything with HDMI in or composite. VGA is also possible with an HDMI to VGA converter.

Can be shuffled, ordered, or scheduled.

instruvctions for setting up a new slideshow + video that I sent dad:

Here are the basic steps for creating a new slideshow pi:

1. Install openelec

2. Configure openelec (hostname, wifi, enable ssh, zeroconf)

3. Add scripts / settings

4. Add media

The trick is to use the slideshow function as opposed to the playlist function, so that it gives more control over how the photos are displayed.

============================
More details:

1. Install Openelec
This is pretty straightforward, there are a couple ways to do it but that’s out of the scope of this post. unfortunately, they changed the way slideshows were created and didn’t allow for making a interfaceless slideshow that mixes video and photos using this method, so to do this you;ll need

Openelec 7.0.1

I use:
OpenELEC-RPi2.arm-7.0.1

Because I have a rapsberry pi 2

2. Configure
This is slightly tricky if you are using a Pi that only has one usb port. The easiest thing is to have a keyboard and wifi adapter plugged in, then just use the menus to set up wifi and enable ssh. It would be theoretically possible to pre-configure it during the install stage, but I didn’t figure that out. I used an old Pi with 4 usb port to set everything up. Once you have SSH and internet everything else can be done remotely. One thing you might want to do is disable auto updates or checking for updates, because that will create an annoying pop up and ruin the moment. I also like using zeroconf, which I think is what causes it to show automatically on the network. I’d also suggest setting up a hostname so it’s easier to ssh/FTP. I find using the mac finder to deal with it remotely to be more frustrating than FTP, but in theory you should be able to manage all the files from Finder on your mac.

3. Add scripts / more configuring
From here on, you can choose to move files to the PI via FTP or using the Finder in Mac. I’m pretty sure enabling zeroconf lets your mac see it automatically, but there might be another option you have to enable. If you can’t see it, then FTP should still work.

I’ll assume you know how to create and edit text files in SSH. I use nano. Don’t use Textedit on the mac, even if you’re using it in plain text mode it still adds funny characters for line breaks or something that will break the scripts.

Scripts / files you need to create:

a) ==========================
/storage/.config/autostart.sh (executes on startup – doesn’t exist by default)

Here’s my autostart.sh. Kodi on the Pi has problems with the clock so I set it to reset it’s clock everytime it starts.:
>>

nano /storage/.config/autostart.sh
<< copy and paste this into the autostart.sh >>
#!/bin/sh

(sleep 30; \/usr/sbin/ntpdate pool.ntp.org; \

kodi-send –action RunScript”(/storage/videos/scripts/EVERYDAY.py)”

) &
<< First line resets the system clock in case it lost sync (important for scheduling/ cron jobs!) Second line runs a script. Now I never have to modify this file again, I can just update the script it's referencing. b) ========================== << nano /storage/.kodi/userdata/advancedsettings.xml >>
(control the look of the slideshow – doesn’t exist by default) Here’s what I added:


.5
1.1


100

c) ==========================

Edit GUIsettings.xml to control speed of stills

NOTE: this file cannot be saved while kodi is running. in order for changes to take effect, you have to stop kodi first with

<< systemctl stop kodi.service >>

The screen will go black, but you can still access the filesystem.

<< nano /storage/.kodi/userdata/guisettings.xml >>
(control the timing – exists by default)

since you’re using nano, hit control-w to search. type in slideshow. replace the slideshow entry with this one

This will keep pics on screen for 60 seconds


true
true
60

d) ==========================
yourscript.py

mkdir /storage/videos/scripts

nano EVERYDAY.py

I call it everyday, because this will be the daily main playlist. I’m making a really long slideshow of videos and images, and I want them to just always play everything on random.

I’m not doing it now, but eventually I’ll add playlist like XMAS.py to play things on christmas. So once I add additional scripts, I’ll probably point autostart.sh to a main.py, which follows some logic and decdes what playlist to play when. for instance here I might have it play things based on hplidays or times of the day.

This script can be stored anywhere and should be told to execute by the autostart.sh
I found it tricky to get the command right based on the documentation, but this works well:

That will play everything in the folder Videos as well as any subfolders and set the slideshow to random. It’s also possible to run this directly in the autostart.sh, but I thought it was cleaner to put this in its own script since you might want to run other things in the autostart.sh and might not want to constantly tweak it.

xbmc.executebuiltin(“SlideShow(/storage/videos/Marcus,[,recursive,random,])”)

[should this be kodi instead of xbmc?

4. Add media.

Pretty straightforward. Just put it wherever you told the script to look:

mkdir /storage/videos/slideshow/

Now you should be able to dump files in their from finder.

note: you might need to turn the zeroconf preference on to see it in the finder automatically

I use FTP (an app called Cyberduck) because it seems less likely to get interrupted than when I was using Finder.

after that you’ll have to reboot

if everything works and you put some videos/pic in the slideshow folder, then after it boots your slideshow should start playing automatically.

take care of it and i’ve had it run for months without needing a reboot.

enjoy!

I might have forgotten something so let me know if you have any troubles!

Apple TV and TVOS: Hello world in TVML tutorial (updated for TVOS 11)

Getting a quick TVML “hello world” on your Apple TV is pretty simple, a quick way to test your setup, and a great way to warm up before starting a new app.

I’ll start with a quick summary in case you’re coming back to this for a reference:


Download Xcode 9

It’s still in beta as of this writing, so you’ll have get it from https://developer.apple.com/xcode/downloads/. This will take awhile to download and to open.


Open Xcode and create a new tvml project.

In the template chooser, choose TVOS from the top, then select TVML app and choose next.
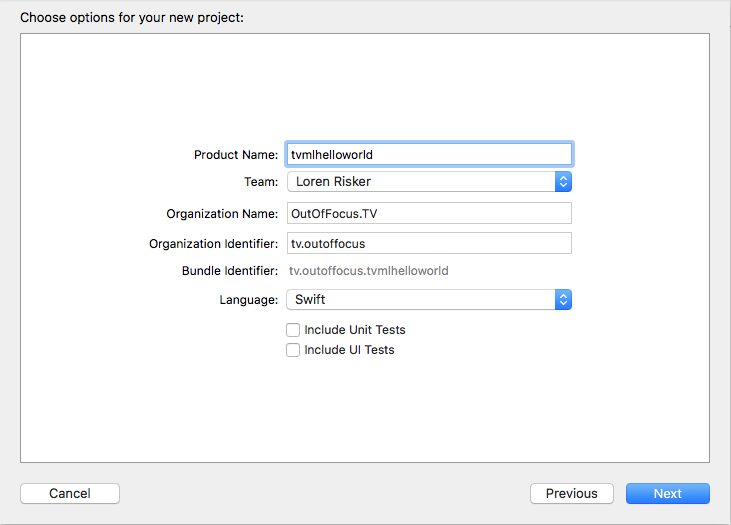
Give it a product name. If this is your first time in Xcode, you might have to do some more stuff here, but I’ll assume you’ve used Xcode at least casually before. Make sure the language is Swift, and leave the 2 boxes unchecked. Save it in a folder. Doesn’t matter where, Xcode will keep things together for you. I keep all my TVOS projects in a TVOS folder in my documents.

<


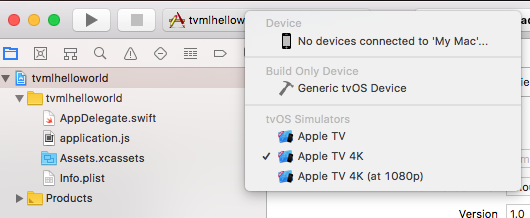
Make sure you have an AppleTV emulator (or device) that Xcode can use.

See the play button at the top? Near there will be the name of your app and next to it is a clickable box for you to choose where to launch your app. You may need to set up an AppleTV emulator if you haven’t already. But don’t hit play yet. If you do, it will build in Xcode just fine, but you’ll get an error in the AppleTV emulator.

before Step 4: here’s a little background:
TVML apps assume that the TVML and javascript you will be writing lives on a server. So the Swift part of a TVML app is tiny, with just enough code to grab your actual app from your web server. Since we’re making video apps, we already have to grab tons of data (video files, thumbnails, icons) from a remote server, so we can just put our tvml and js on the same server (or a different one, doesn’t matter. I just use my web host). So to publish an app in the app store, you will need a web host for your tvml, js, and videos.

So now we have to either make our own web server, or use one already set up and tell our project where it is. For this tutorial we will keep everything easy and local, so we’ll set up our own webserver. Fortunately Apple tells us how right in the comments in our Swift code.


Launch your web server:
ruby -run -ehttpd . -p9001

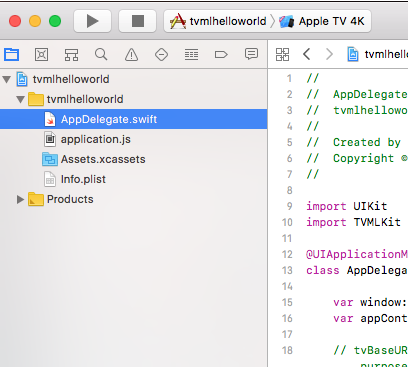
In Xcode, on the left, click on AppDelegate.swift. (you might have to click the small folder icon on the very left, or hit command-1)

Your AppDelegate.swift will open in the main window. Most of this code can be left alone. We just need to make sure it knows where to find the rest of our code.

The information about our webserver is in line 19 and 20. Line 19 just tells us our base server name, and line 20 tells us where our first javascript file is located. The rest of the code just launches that javascript file, and the swift part of our app is done. So you could enter in a custom url here, but let’s just keep it easy and leave it alone for now. Check the comments on line 18. It tells us that running this command in terminal is all we need to do to run a webserver:

ruby -run -ehttpd . -p9001

We just have to run it from the right folder.

So open a terminal window and go to your project folder. An easy way to do this is to enter
cd
then drag and drop your project folder to the terminal window, and hit enter. The folder you are looking for sits next to your Xcode project and contains AppDelegate.swift and application.js. Verify you are in the right place by typing
ls

If you see application.js listed then great, enter:
ruby -run -ehttpd . -p9001


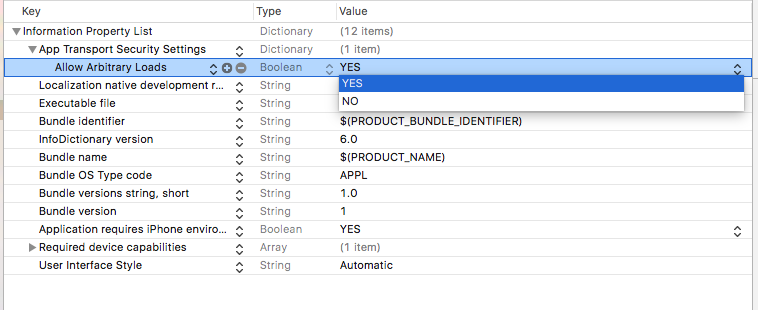
Set NSAppTransportSecurity to Allow Arbitrary Loads in your Info.plist

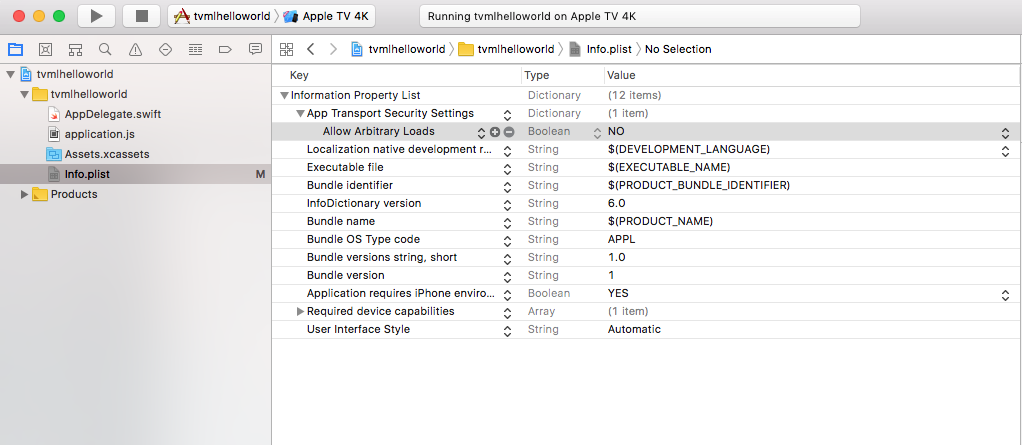
One last annoying task. Apple prefers https, and we aren’t running a secure local server, so we have to allow our app to access http. Go back to the Xcode sidebar and select the Info.plist. If you tried to build your app now, even though everything is setup, you’ll still get an error.

When you select Information Property List it will show a little plus sign.

Click it to add a field. Type in
NSAppTransportSecurity

Now it will automatically convert it to say “App Transport Security Settings” and add a little disclosure triangle. Twirl the disclosure triangle down. It won’t reveal anything, but if you don’t twirl the disclosure triangle down, the next step might not work.

Click the plus next to that field and select the first option, Allow Arbitrary Loads. Switch the value from NO to YES.


Step 6

Click the play button to launch your app.

If it doesn’t work, let us know in the comments.

Want to keep going? Find out how to make a single page application in the next tutorial.

Please check out my music video channel on the Apple TV appstore: OOFTV: 24/7 streaming music videos and more

Videosketch – Palm Tree Sunset with Blackmagic Fusion

Lately I’ve been trying to get a little better with animation and 3D so I’ve been exploring some of the software tools out there. It’s pretty incredible what you can get for free these days, specifically Blender and Blackmagic Fusion.

I’ve also been into Vaporwave and saw something similar to this so I was curious if I could recreate it. I use Motion a lot for sketches, but any 3D work in Motion is kind of cumbersome so it seemed like a good easy challenge to open up Fusion.

This took me a lot longer than I care to admit but it’s just an emitter with a duplicate3D for the Palm trees.


Widescreen video isn’t for everyone

Did you know you can embed a video of nearly any size/aspect ratio on your blog using YouTube?

The YouTube player and app strongly favors videos that are published in the 16:9 widescreen aspect ratio.

But that doesn’t mean you can’t upload arbitrary resolutions and embed them nicely.

I wanted to test the limits so I cropped a video clip to a handful of resolutions to see what would happen, then embedded them in a player that matched the video resolution size.

(video samples are from the lyrically immature and musically genius song by Sonny and the Sunsets)


The standard 16×9


The old 4:3 broadcast standard


A ratio like this works great for flashy headers


Keep in mind that as long as you keep the ratio, the video can be any size.
Here’s the same video link embedded quarter of the size:


I could imagine this as sort of a poster/billboard signage with lots of text mized with some images.


Unfortunately if you don’t leave room for the player controls it can look ugly and be hard to play.


Interestingly I couldn’t get anything narrower than 40 pixels to finish processing, although I never got a specific error. So it seems that there may be a hard limit of around 40 pixels for the width, probably to fit the play button. Anyway, not sure why you’d want this ridiculous size but who knows?